User Training Guide
Table of Contents
01 - Introduction
02 - Installing the LifeSpot App
03 - Notification Settings
04 - Registration
05 - Verifying Your Email
06 - Enabling Location Services
08 - Receiving an Alert
09 - Serious Injury Status
10 - Chatting with Law Enforcement
12 - Frequently Asked Questions
Prefer to get your training in a video?
Watch our full user tutorial videos here
Introduction
This manual is a comprehensive guide for the proper download, registration, and use of your LifeSpot App technology.
LifeSpot should only be used in the event of an active killer threat. If you fear your life is in danger, whether that is from an active shooter, an assailant with a knife, or any other threat to your life. This App is not for other medical emergencies or other events that might require notification to emergency responders; (ie., 911, law enforcement, Fire/EMS).
LifeSpot solves seven challenges that are often present in active shooter events:
NOTIFICATION
LifeSpot alerts all users and emergency responders within seconds.
RESPONSE TIME
LifeSpot’s ability to alert 5 groups simultaneously significantly reduces emergency response time.
LOCATION
LifeSpot identifies the threat location and tracks each user with GPS during an event.
SERIOUS INJURIES
LifeSpot allows injured victims to set their injury status so that they can receive lifesaving medical care faster.
COMMUNICATION
LifeSpot gives users the power to message directly with law enforcement.
IDENTIFICATION
LifeSpot identifies any armed staff to emergency law enforcement.
RE-UNIFICATION
LifeSpot allows users to account for themselves, students, and colleagues, making re-unification simpler.
LifeSpot works by using GPS services on your smart device to identify your personal location relative to the identified location of the threat(s).
The LifeSpot App has been approved to send “critical alerts” and will send a notification that overrides silent or do-not-disturb settings on your Smart Phone in the event of an emergency.
Although we hope you never have to activate a LifeSpot alert, this manual will equip you with the knowledge you need to use the LifeSpot App effectively to save lives.
Installing the App on Your Phone
Downloading to an Apple device
1. Open the “App Store” app on your iPhone.
2. Search “LifeSpot” in the search bar at the top of the screen.
3. Click the “GET” button.
4. Follow the prompts to finish installing the LifeSpot App.
Downloading to an Android device
1. Open the “Play Store” app on your Android phone.
2. Search “LifeSpot” in the search bar at the top of the screen.
3. Click the “INSTALL” button.
4. Follow the prompts to finish installing the LifeSpot App.
Notification Settings
On both iOS and Android, when you open the LifeSpot App for the first time, you will be required to configure your notification settings.
iPhone Notifications
-
Open the LifeSpot App and select "Allow" when asked if you would like LifeSpot to send you notifications.
-
Select "Allow" when asked if you would like to allow critical alerts.
-
This will allow you to receive audible notifications in the event of a LifeSpot alert or drill, even if your device is set to silent or "do not disturb".


Android Notifications
-
Open the LifeSpot App and select "Allow" when asked if you would like LifeSpot to send you notifications.
-
Your phone will now be set up to receive audible alerts in the event of a LifeSpot alert or drill.

Notification Settings: Video
Prefer to get your training with a video? Watch this:
Registration
-
When you open the LifeSpot App for the first time, you will see a button to “Register Now”.
-
Once you click the button, you will be prompted to enter the access code provided by your administrator. If you have not received this code, contact
your administrator.
-
If you receive an invalid code message, check the code and try again. Remember the code is case-sensitive.
If the issue persists, check with your administrator.
-
Enter your information as prompted on the screen. This information will include your first name, last name, organization email, and cell phone number.
-
Check the “terms and conditions” box and click “Submit”.


Email Verification


-
Before you can use your LifeSpot App, you will need to verify your email.
-
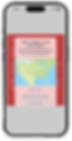
After signing up, a message will appear asking to “Verify your email”.
-
Check your junk or spam folder if you do not receive an email within a few minutes.
-
Open the email and click the “Verify Email” button. You will receive a message that says “Your email has been successfully verified!” Click the red button that says “Back to app”, and you will be redirected back to your LifeSpot App.

Enabling Location Services
iPhone Location Settings
-
After verifying your email, you will be prompted to enable location services.
-
Click the button that says “Enable Location Services”.
-
A screen asking “Allow LifeSpot to Use Your Location?” will appear. Select “Allow While Using App”. You will NOT be tracked in the background and your location will only be visible when a LifeSpot alert is active.
.

-
You will then be prompted to complete an in-app tutorial. At the end of the tutorial, you will be asked to complete an in-app quiz. If you answer a question incorrectly, you will not be able to proceed until answered correctly.
-
Once you complete both the quiz and tutorial, your app is ready to use. It will appear as “temporarily disabled” if your facility has not yet gone LIVE.
-
DO NOT SWIPE THE FOCUS BUTTON unless you see an active shooter(s).

Android location settings
-
After verifying your email, you will be prompted to “Enable Location Services”. Click the button that says “Enable Location Services”. You will NOT be tracked in the background and your location will only be visible when a LifeSpot alert is active.
-
A screen asking “Allow LifeSpot to access this device’s location” will appear. Select “Precise”
. -
Then, select ”While using the app”.


Activating an Alert
If an active shooter threat is identified, the LifeSpot App will allow you to activate an alert. Please note, DO NOT activate a LifeSpot alert unless there is an active killer threat, or you are in drill mode and instructed by your administrator. Your administrator will advise you on the status of your app (LIVE or DRILL mode). Regardless, do not swipe the focus button unless you have identified an active threat or have been instructed to start a drill by your administrator. We recommend putting the LifeSpot App on your home screen by itself so that in the event of an active killer event, it is easy to find and activate.
DRILL Mode
-
If your app is in drill mode, you will see a message saying “You are authorized to start a LifeSpot drill?” If you click yes, you will be directed to the drill mode focus button.
-
Do not swipe the button if you have not been instructed to begin a drill by your administrator. Swiping it will alert all staff members in your facility.
-
After selecting “yes” in drill mode, You will see “DRILL MODE” at the top of your screen. All elements on your screen will be gray and there will be no moving or flashing. “Swipe and hold to activate drill” will be displayed at the top of your screen.


LIVE Mode
-
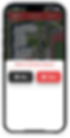
If your app is in LIVE mode, the message will say “Lives are in danger and you need to start a LifeSpot alert?” with the option to select YES or NO. If you select yes, you will be directed to the LIVE ALERT focus button.
-
Swiping it WILL alert emergency responders and all staff members in your facility that there is an active shooter event.
-
After selecting YES, “LIVE ALERT” will be displayed at the top of your screen. All elements on your screen will be in red and will be moving and flashing. “Swipe and hold to activate” will be displayed at the top of your screen.


-
Press, swipe, and hold the focus button for
three (3) seconds.
-
You will be prompted to select the floor on which you identified the threat. If your facility has only 1 floor, you will not have this option. Only the activator of the alert will be prompted to select the floor.


-
The phone number for 911 will appear. Please call 911 and explain the situation if you are the activator, even if it’s a false alarm.

Activating an Alert: Video
Prefer to get your training with a video? Watch these:
Activating an Alert
Live Mode vs Drill Mode
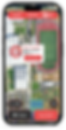
Receiving an Alert
If an alert is started at your facility, you will be notified via an audible and visible notification. This alert will sound even if your phone is on silent or do-not-disturb. Open the app if you hear the alarm.

-
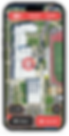
The red-shaded circle is the area where the threat has been identified. It is an area of approximately 20 meters. The number inside the circle is the floor number on which the threat was identified.
-
The yellow dot is your approximate location. This dot will change colors between green, yellow, and red depending on which status you select.
-
A 911 button will always be visible. This allows you to quickly call 911 at any time if needed.
Selecting a status
-
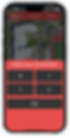
Select “Fortify” if you believe remaining in your current location is the safest option.
-
Select “Flee” if you believe leaving your current location is the safest option.
-
If you or someone in your area is injured, you can click the “Injured” button if it is safe to do so.
-
Keep your phone with you. Your safety is the number one priority so only use the LifeSpot App if it is safe to do so.
Receiving an Alert: Video
Prefer to get your training with a video? Watch this :
Serious Injury Status
If you have been seriously injured, or are with someone who has sustained a serious injury, let law enforcement know by setting an injury status in the app. This will help law enforcement send medical help to the correct location.
-
In the bottom right corner of the screen you will see a button marked "Injured". If you or someone you are with has been seriously injured, click this button.
-
You will then be asked if you want to mark a serious injury. Click "Yes".

-
You will then be asked to indicate what floor you are located on. If your facility only has one floor, you will not be asked this question.
-
You will now appear as "seriously injured" to law enforcement, and the dot indicating your location will turn red.

Chatting with Law Enforcement
If you have pertinent, lifesaving information please send a chat to law enforcement. Chats should only be sent if it is safe to do so.
-
You will only see chats between yourself and law enforcement.
-
Law enforcement can send chats to you individually or to groups of people.
-
Chats from law enforcement will be indicated by a number on the corner of your chat button.
-
You will not see chats from your colleagues, or be able to chat individually with your colleagues. The chat feature is reserved for chatting with law enforcement only.

Setting Your Location
Occasionally, there are barriers that interfere with your phone's GPS signal. If this happens and you notice your location isn’t in the correct spot, you can adjust it by following the steps below if it is safe to do so. This app will not background track your location unless there is an active alert at your facility.
-
Tap on your location dot in the app.
-
A bubble will appear with a prompt saying “Set Location”.
-
Move the map background so your dot is in the correct place. Please note that the dot itself does not move. The map behind your dot moves.
-
Press the “Set” button at the bottom of the screen to send your updated location to law enforcement.
-
If you decide to move and it is safe to do so, return to real-time location tracking by pressing your location dot again.
-
A bubble will appear saying “Auto- Locate”. .
-
Tap “Auto-Locate” to return to real-time tracking.


Setting Your Location: Video
Prefer to get your training with a video? Watch this:
Frequently Asked Questions
My app has a spinning circle. What's the problem?
When it spins, it means the app is not picking up wifi or cellular reception. If a wifi network is available, be sure your phone is properly connected. If no wifi network is available, check your carrier's cellular data settings.
I have an Apple Watch. Will I get notifications on my phone and watch?
No, you will need to choose which device you are getting notifications on. If you choose an Apple watch, you will get a vibration on your wrist but no audible alert on your phone. If an alert goes off, your watch will not have the same capabilities as the mobile app. Please open the mobile app on your phone to set your location, report injuries, or chat.
When I clicked “Fortify” or “Flee” my location dot wasn’t in the correct place. How do I fix this?
In an emergency, only set your location if it is safe to do so. To learn how to set location and auto-locate, refer to the “Setting your Location” section in this manual.
What is the number in the red-shaded circle?
The number displayed in the red shaded circle is the floor number the threat was identified on. If your facility does not have more than one floor, the number “1” will be displayed.
What is the billing frequency for my subscription? Do you pro-rate subscriptions?
There is a one-time annual payment once the contract is agreed upon and the training is set. We do pro-rate subscriptions based on the specific request; for example, to meet budgetary allowances or restrictions. All invoices must be paid in full prior to the completion of training.
When is it appropriate to use the LifeSpot App?
The ONLY appropriate time to use the LifeSpot App is if there is an active killer situation within your facility's geofence. When you press, swipe, and hold the button for 3 seconds, emergency responders will be alerted and sent to your location.
Can the LifeSpot App be activated from my home or other public places?
No. The app will only be able to be activated from inside your geofence. Geofences are configured by our team with input from your facility’s leadership, to include the entirety of your campus. If you are outside of your geofence when an alert is activated you will still get the alert. You will not be able to chat or set your status if you are not within the geofence.
I travel between locations. Will I still be able to use my app?
Yes. Contact your administrator to confirm you are an assigned user at all facilities you travel to.
Will I still receive an alert if I am outside of the geofence?
Yes, you will be able to receive an alert. But, you are not able to activate it from outside of the geofence. We don’t want you to travel into a dangerous situation, so regardless of your intentions, stay away from a location that has started an alert, and wait to be contacted. Try not to contact anyone that you think may be involved, they will need to concentrate on their own safety and the safety of those around them.
When running a drill, it tells me to call (123)456-7890. What am I supposed to do?
During a drill, you can click cancel when the phone number is prompted. But, if this were a real, life-or-death situation, the phone number would read “911”. You will need to call 911 and speak with dispatch about why you swiped the alert, even if it is an accidental activation.
Will this app track me?
The app will only track you when the app is open and active. When it is closed, it will not track your location.
Will my data be stored or tracked?
No, your data is secure and will not be sold or shared with additional parties. Your participation and choice to have this app are confidential.
Can we add users even after our app has gone “LIVE”?
Yes, you can add users whenever you want as long as there are available subscriptions. We strongly suggest that you put your facility in drill mode when you have a new staff register and complete the in-app tutorial to mitigate any possible false activations to emergency responders. If you need additional licenses, contact your LifeSpot team!
If I am in “Drill Mode” law enforcement is not notified, correct?
If you are running a drill, we encourage you to get in contact with your local law enforcement so they are able to participate. This is great practice for you and them! If they have their preferences set to receive drills, they will get the alert. We are happy to help you coordinate these details if needed.
User Tutorial Videos
If you find it easier to learn through videos, here are our full user tutorial videos for iOS and Android:
iOS (apple) User Tutorial
Android User Tutorial